|
How to Make a Praxinoscope and Praxinoscope Discs Using a Repurposed Record Turntable |
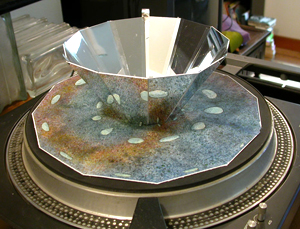 My praxinoscope made with flexible plastic mirrors and an old turntable | You can make a praxinoscope fairly easily and inexpensively by repurposing a record turntable. You will also need mirrored mylar, or better yet, flexible mirrored plastic. It is a relatively simple process if you take your time to measure carefully, remember the basic geometry of circles (especially how to use the radius to make arcs and equilateral triangles) and work with good, sharp tools. |
Making a Faceted Mirror for a PraxinoscopeMaterials: 1 sheet of 9 x 12 inch mirrored mylar, 7mm thick or 1 sheet 8 1/2 x 11 inch flexible plastic mirror available from World Class Learning, product D-EJ1150. Mirrored mylar is less expensive and easier to cut with a blade and straight edge. Mirrored plastic is best cut with a heavy duty paper cutter; it is more rigid and durable, and once cut, easier to assemble.
3 inch square piece of matte board (any color), silver slide tape or transparent tape, painters blue masking tape. |
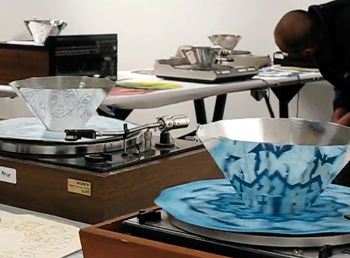 Student made praxinoscopes with mylar mirrors and copper-plate etched animated discs at The Evergreen State College winter, 2010. To read more about this project, see my teaching blog. |
| Tools: Straight edge/ruler, protractor, pencil, eraser, fine tip alcohol based pen for marking, Japanese book board punch (1/4 inch) and mallet or similar hole-punching tools, heavy duty exacto knife with sharp blades for mirrored mylar, or a heavy duty paper cutter for mirrored plastic. |
| Faceted Mirrors: | |
|
1. Wash hands before working with the mirrors to keep them smudge free. Measure and cut the mirrored mylar or mirrored plastic into two 4 1/4 x 12 inch strips. Make sure the sides are parallel and corners are square before cutting. 2. Orienting one strip horizontally, measure 2 inches from the upper left corner along its length. This is the top of the first wedge. 3. From the lower left corner measure 5/8 inch, then 3/4inch. The 3/4 inch length is the base of the first wedge. 4. Score a line from the lower left corner of the wedge to the upper left corner of the wedge. Score another one from the lower right corner of the wedge to the upper right one. Use a protractor to measure the angles. They should be about 82 degrees for the upper corners and 98 degrees for the lower ones. 5. From the lower right corner of the wedge measure 2 inches and place a mark. From there measure 3/4 inch and place a mark. From there measure 2 inch and place a mark. Continue along the lower edge of the mylar or plastic measuring alternately 2 inch lengths and 3/4 inch lengths. |
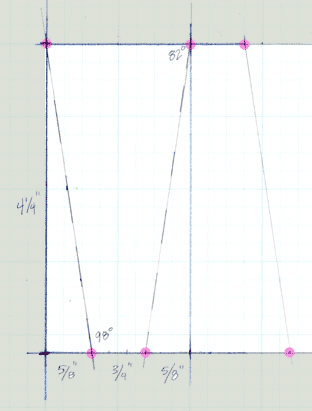 |
| 6. From the upper right corner of the wedge measure 3/4 inch and place a mark. Continue along the upper edge of the mylar or plastic measuring alternately 2 inch lengths and 3/4 inch lengths. 7. Score lines joining the lower points to the upper points to form wedges of equal size and angles. Use the protractor to check the angles before you cut. 8. Repeat steps 2-8 until you have a minimum of 12 wedges drawn out. 9. Using the straight edge and a sharp exacto knife for the mylar, or the paper cutter for the plastic, cut the wedges apart. 10. Lay 12 wedges side by side, fanned so the 3/4 inch bases all orient towards a center. If you are using the plastic, you should peel off the protective coating at this point. Use the blue tape to temporarily join the wedges. Butt the edges together to avoid gaps, but do not overlap them. 11. Flip the joined wedges over. Lay lengths of silver or clear tape along the joints to seal them, then remove the blue tape and trim any excess tape with the knife. 12. For the last joint, bend the connected wedges to form a cone so that tape seals are inside and the last two untaped edges butt up against each other. You may need a second pair of hands to hold them in this position while you seal this last seam with tape in the inside of the cone. 13. You may want to make two small tabs of the tape to attach opposite each other at the widest edges of the cone. These will give you something to hold onto without leaving fingerprints when placing the faceted mirror on and off the turntable. |
|
Center Spacer You'll need a spacer with a 1/4 inch hole punched in the center to hold the cone of faceted mirrors on the record player spindle. Here are directions for making out of matte board. (If you're feeling adventurous or thrifty, you can also make it out the 3" diameter metal lid of a mason jar!) 1) Start with a 3 inch square piece of matte board. Score diagonals from the corners to find the center. 2) Using a compass set with a 1 1/2 inch radius, score a circle from the center point. 3) Use the compass set at the same radius to mark off the circle's circumference into sixths. |
|
4) Draw lines from each mark on the circumference to the next to form a hexagon. 5) Use the exacto knife to cut out the hexagon. 6) Measure 1/8 inch on either side of the center point along the diagonal lines to form a 1/4 inch square. 7) Line the Japanese book board punch up in the square and punch out a hole for the spindle.
8) Place the center spacer on the turntable spindle and the cone of faceted mirrors around that. If the spacer is to big for the base of the cone, trim it down evenly.
|
Making Disks for the Praxinoscope 1) Cut 12 inch square pieces of paper. Score diagonals from the corners to find the center. 2) Using a compass set with a 6" radius, score a circle round the center point. 3) Use the compass set at the same radius to mark off the circle into sixths. 4) Draw lines from each mark on the circumference to the next to form a hexagon. Draw a light line from one mark on the circumference through the center point to the mark on the opposite side of the circle. Connect all six points so you have six wedges. 5) Find and mark the midpoint of one facet of the hexagon. Line up the straight edge with that point and the circle's center point to find the midpoint on the opposite side of the circle. Draw a line along it that intersects the circumference on both ends. 6) Using the compass with radius set at 6 inches, place the point at one of the intersections of that line with the circumference to score an arc to find the midpoint of the next hexagon side. Continue to score arcs to find the midpoints of the other hexagon facets. 7) Draw lines connecting each midpoint with its opposite, making sure the lines intersect the circumference on both ends. This makes a dodecagon, a 12-sided polygon with 12 wedges, or frames, in which you can animate imagery. 8) Trim the excess paper by cutting along the circumference or cutting straight along each of the 12 sides. 9) Punch a 1/4 inch diameter hole in the center of the disk.
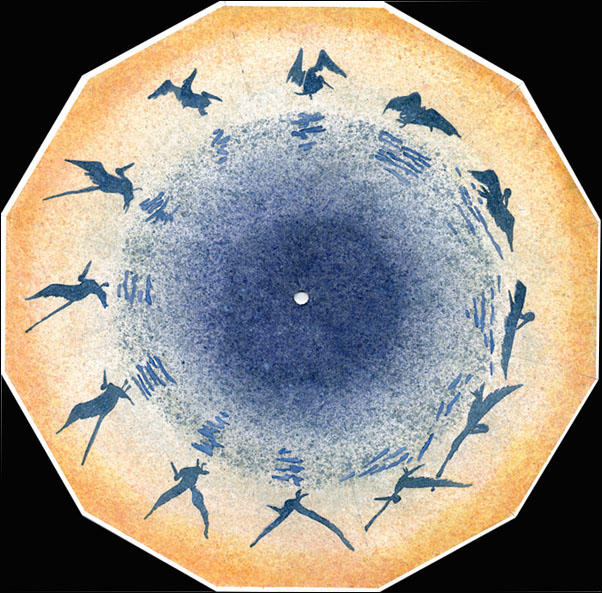
Pelican Spatter Study, watercolor imagery rotoscoped from 16mm film footage, 2009. |